Category Archives: Sewing Ideas

Maple Leaf quilt block flag

Standard
Maple Leaf quilt block flag

In honour of our National Flag Day here in Canada, and especially this year, which is the 50th anniversary of the flag, I made my own little quilty version.  And yes, I’m posting it a few days late!  It’s the thought that counts.  Besides, if you decide to make one, it will be great for Canada Day this summer.  Here are some stats that I found on the government website about our Canadian Heritage.  A brief history lesson (it’s good for me since I didn’t grow up in Canada):

According to many historians, the maple leaf began to serve as a Canadian symbol as early as 1700 when, before the coming of the first European settlers, Canada’s aboriginal peoples had discovered the food properties of maple sap, which they gathered every spring.   In August 1860, at a public meeting held in Toronto, the maple leaf was adopted as the national emblem of Canada for use in the decorations for the Prince of Wales’ visit.   In 1914, many Canadian soldiers wore the maple leaf on their military badges, and it was the dominant symbol used by many Canadian regiments serving in the Great World War I.  Red and white were approved as Canada’s official colours in the proclamation of the royal arms of Canada in 1921 by King George V.  In 1964, the Government made the creation of a distinctive Canadian flag a priority.  When Parliament could not reach agreement on the design, the task of finding a national flag was given to an all-party Parliamentary committee.  After considering thousands of proposals for flags submitted by Canadians, the committee chose three final designs.  It was the single leaf, red and white design that the Committee recommended to Parliament. The motion was passed to adopt this design as the National Flag of Canada with a vote of 163 to 78 on December 15, 1964.

On February 15, 1965 our national flag was raised for the first time on Parliament Hill. Canada was just two years away from centennial celebrations when the maple leaf flag was made official by Royal Proclamation. In 1996, February 15 was declared National Flag of Canada Day and has been observed every year since.  February 15, 2015, will mark the 50th anniversary of the National Flag of Canada.

We are a young country, but it still surprised me that our flag is so very young!  I’ll have to ask my Dad if he remembers when the flag was adopted! 😉

In order to celebrate, I searched around online to find a maple leaf quilt block that I could sew up with some cute red fabric my sister gave me.  I found that Anjeanette Klinder had posted a tutorial for a very lovely maple leaf block table runner.  Another cool thing was that her maple leaves were made from charm packs, love that idea, but I as yet have no charm packs!  Anyways, the all-red leaf was what I was going for, you know, for flag day.  So I followed her instructions…mostly.  I’m not so good at quilty math and stuff like that, so the middle point on my leaf didn’t turn out like hers, I kind of just eyeballed it instead of following her geometrical directions! 🙂  I have really been having fun piecing together quilt block designs.  Love the way squares sewn together become fairly easy points and triangles!  Here is a quick step-by-step of how the sewing up of the maple leaf happened (sew and flip):maple leaf quilt block flag by dennasideas.com - Page 001

Then after playing around with the outer edges of the block (should I keep it square?), my daughter liked the more traditional flag-shaped rectangle, so I went for this idea, appliqued a stem, and added jumbo rickrack to the sides (because jumbo rick rack is just so jumbo and awesome!):maple leaf quilt block flag by dennasideas.com - Page 004Quilting powers activate!!!  I’ve been practicing, and this was a great project to practice quilting on.  I don’t have a walking foot or darning foot, so no free-handed stuff!  It’s all start and stop and turn and start, so the straight sides of the leaf were good to practice echo quilting on.maple leaf quilt block flag by dennasideas.com - Page 005I did what Anjeanette suggested and added extra batting under the leaf.  Another close-up.  Hey, not perfect, but great practice, and I just LOVE THE RED AND WHITE!!!maple leaf quilt block flag by dennasideas.com - Page 006maple leaf quilt block flag by dennasideas.com - Page 002I added tabs so we could hang this little flag up on the wall, and there it hangs!  O Canada!  Happy Flag Day!
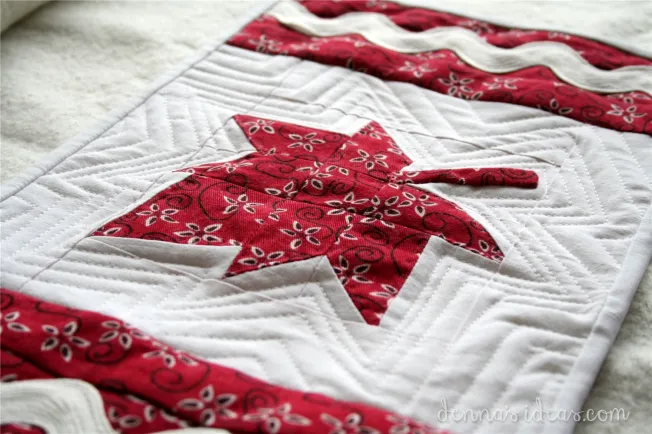
P.S.  I even used Canadian spelling for this patriotic post!  Did you notice?  (I usually spell American style)

my sewist journey: making a minky baby taggie and stuffed blocks

Standard
my sewist journey: making a minky baby taggie and stuffed blocks

I used to make Barbie dresses by cutting out a circle of fabric, adding three holes in the middle, fitting it over the head and arms of the doll, adding a belt, and there you go!  A great Barbie dress.  And then came dresses with a few hand-stitches involved.  Eventually, my mom let me use her sewing machine to make a few things…but I don’t think that went very well.  Fast forward many many years, and I find myself knowing a lot about sewing, from pure osmosis, but not really being able to even thread a machine.  From hanging out with my Mom and her quilting magazines, I started to feel the urge to really sew, like a real sewist.  (haha, that is a word apparently)  Sew, with the help of my Mom and a friend, I have started on the sewist path in life.  I can now thread and re-bobbin my machine.  Next step in this new world: tools.  I was almost overly excited with this purchase (thanks to a Michael’s coupon).  You people rarely see me so excited, I can tell you.  Now to begin: I have a cutting mat, ruler and cutter, bring on some fabric!denna's ideas my new tool set

Sew, the other day I picked up a little kit for a ‘baby taggie blanket’ at a (insert heavenly music) quilting store and decided that I would make it for the next day’s baby shower.  First I needed to test my new rotary cutter….on something……here this will do….she doesn’t needs sleeves anyways…??????????????????????

The new kit was an assortment of cut ribbons, a small rectangle of flannel and a small rectangle of…..purple minky.  (Yes, that’s really a word, too)  At the last minute I decided maybe I should look up ‘tips for sewing with minky’ online.  Well, it turns out it’s a good idea to wash your fabrics before you use them…sewing with flannel and minky by dennasideas.comI read this after I had cut the flannel.  Instead of making just a little blanket, I thought how cool it would be if I could make some baby blocks to go along with it.  (I was feeling ambitious with my new tools!)  And so now I needed to wash the pieces.  I really didn’t think I could or should skip that step.  (Someone said that the minky is treated with sprays for bugs!)  I carefully threw them in the wash in those little mesh washing bags…..and came back to this:??????????????????????ugh.  Who knew flannel unravels so much!?  (Probably everyone but me).  I was able to salvage my pieces, and since there wasn’t an exact pattern for the taggie blanket, I just kept trimming.  This project had to keep going, no matter what.??????????????????????This was the piece for the stuffed blocks which I was going to make with scraps of flannel and minky.  *Maybe I should pause here and insert a little dictionary of terms, since they were fairly new to me and might be to you, too.  A “taggie” blanket is an extra small blanket for a baby to play with, rimmed with “tags” of ribbon.  Have you ever noticed how fond babies are of playing with and sucking on those little tags on the bums of stuffed animals?  Someone somewhere noticed and invented these cute, mother-sanctioned, play blankets.  Cool, eh?  And now about the Minky…..

As I was starting my project, it was immediately interrupted by supper.  While we were eating, I casually mentioned my new little project, and added offhandedly, “I had to wash my Minky” into one of those conversation lulls that sometimes happens. Talk about your supper conversation stopper.  After a long awkward pause, and a few ‘Mom-what-on-earth-are-you-talking-about-?’ glances, I explained that Minky is a fuzzy furry kind of fabric sometimes used to make quilts or backing quilts, and it may or may not have little bumps all over it.  Ahhhh!

I dare you to try that phrase out at your next supper party.  (You could practice it a few times out loud right now!)  It might get some interesting reactions, if you sup with non-sewers.??????????????????????Sew, I tried to make sure I figured this all out.  Right sides together, ribbons facing in, check.  It seemed like a bit of quilting should be added to keep the minky and flannel together and un-floppy.  Some notepaper as a quilting pattern seemed like a good idea.  Pin that slippery Minky down!??????????????????????Just sew over it….??????????????????????And easy as pie, tear away the paper…..or not……??????????????????????the stitches looked like they’d rip out, so I ended up using a seam-ripper (another cool tool) to perforate the paper and to c a r e f u l l y rip it out from around the stitches.  Waaay more work that I had originally bargained for.  Now for those exciting, 3D blocks!  The pattern in the magazine looked straight forward enough…??????????????????????Wow, I couldn’t believe it!  Matching up the dots and actually following instructions left me with an actual 3D block!! Oh wait, you have to turn it inside out???????????????????????Maybe leave that opening a bit bigger next time…..   And sew, 2 blocks were sewn and I felt very accomplished and proud.  Tada!  Here are the pics: baby taggies and blocks by dennasideas.com - Page 002 baby taggies and blocks by dennasideas.com - Page 001baby taggie and blocks by dennasideas.com - Page 003Found some fun baby sleepers to go with my sewing projects!baby taggies and blocks by dennasideas.com - Page 004The best part: finishing on time for the surprise baby shower!!  It’s nice to give something that has had a lot of my time, love, and work put into it.  I definitely learned a few lessons…..probably won’t be buying or washing Minky in the near future, will sew edges of flannel before washing, etc.  I figure every project will teach me something new.  Oh, wait, that sounds like school or something, yuck!  What I mean is that I plan to have fun making some awesome sewing projects in the near future, whether I learn something or not!