Category Archives: How To Tutorials

Maple Leaf quilt block flag

Standard
Maple Leaf quilt block flag

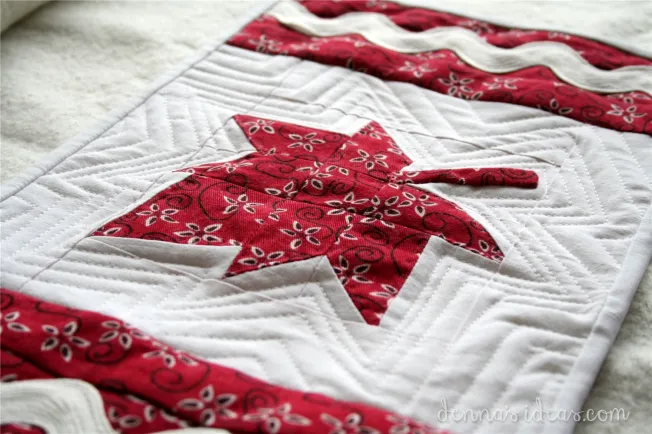
In honour of our National Flag Day here in Canada, and especially this year, which is the 50th anniversary of the flag, I made my own little quilty version.  And yes, I’m posting it a few days late!  It’s the thought that counts.  Besides, if you decide to make one, it will be great for Canada Day this summer.  Here are some stats that I found on the government website about our Canadian Heritage.  A brief history lesson (it’s good for me since I didn’t grow up in Canada):

According to many historians, the maple leaf began to serve as a Canadian symbol as early as 1700 when, before the coming of the first European settlers, Canada’s aboriginal peoples had discovered the food properties of maple sap, which they gathered every spring.   In August 1860, at a public meeting held in Toronto, the maple leaf was adopted as the national emblem of Canada for use in the decorations for the Prince of Wales’ visit.   In 1914, many Canadian soldiers wore the maple leaf on their military badges, and it was the dominant symbol used by many Canadian regiments serving in the Great World War I.  Red and white were approved as Canada’s official colours in the proclamation of the royal arms of Canada in 1921 by King George V.  In 1964, the Government made the creation of a distinctive Canadian flag a priority.  When Parliament could not reach agreement on the design, the task of finding a national flag was given to an all-party Parliamentary committee.  After considering thousands of proposals for flags submitted by Canadians, the committee chose three final designs.  It was the single leaf, red and white design that the Committee recommended to Parliament. The motion was passed to adopt this design as the National Flag of Canada with a vote of 163 to 78 on December 15, 1964.

On February 15, 1965 our national flag was raised for the first time on Parliament Hill. Canada was just two years away from centennial celebrations when the maple leaf flag was made official by Royal Proclamation. In 1996, February 15 was declared National Flag of Canada Day and has been observed every year since.  February 15, 2015, will mark the 50th anniversary of the National Flag of Canada.

We are a young country, but it still surprised me that our flag is so very young!  I’ll have to ask my Dad if he remembers when the flag was adopted! 😉

In order to celebrate, I searched around online to find a maple leaf quilt block that I could sew up with some cute red fabric my sister gave me.  I found that Anjeanette Klinder had posted a tutorial for a very lovely maple leaf block table runner.  Another cool thing was that her maple leaves were made from charm packs, love that idea, but I as yet have no charm packs!  Anyways, the all-red leaf was what I was going for, you know, for flag day.  So I followed her instructions…mostly.  I’m not so good at quilty math and stuff like that, so the middle point on my leaf didn’t turn out like hers, I kind of just eyeballed it instead of following her geometrical directions! 🙂  I have really been having fun piecing together quilt block designs.  Love the way squares sewn together become fairly easy points and triangles!  Here is a quick step-by-step of how the sewing up of the maple leaf happened (sew and flip):maple leaf quilt block flag by dennasideas.com - Page 001

Then after playing around with the outer edges of the block (should I keep it square?), my daughter liked the more traditional flag-shaped rectangle, so I went for this idea, appliqued a stem, and added jumbo rickrack to the sides (because jumbo rick rack is just so jumbo and awesome!):maple leaf quilt block flag by dennasideas.com - Page 004Quilting powers activate!!!  I’ve been practicing, and this was a great project to practice quilting on.  I don’t have a walking foot or darning foot, so no free-handed stuff!  It’s all start and stop and turn and start, so the straight sides of the leaf were good to practice echo quilting on.maple leaf quilt block flag by dennasideas.com - Page 005I did what Anjeanette suggested and added extra batting under the leaf.  Another close-up.  Hey, not perfect, but great practice, and I just LOVE THE RED AND WHITE!!!maple leaf quilt block flag by dennasideas.com - Page 006maple leaf quilt block flag by dennasideas.com - Page 002I added tabs so we could hang this little flag up on the wall, and there it hangs!  O Canada!  Happy Flag Day!
P.S.  I even used Canadian spelling for this patriotic post!  Did you notice?  (I usually spell American style)

St. Paddy’s Day Green Mason Jar Desserts

Standard

A sweet little green dessert packed in serving-sized mason jars!  For half of the winter I’ve been looking forward to celebrating the green…the green of spring.  There is no green around here.  Amazingly, the snow has started melting a lot and we can see grass, it’s just not green yet.  Seriously, it’s been about 12 years since we’ve had nice weather to be outdoors for my daughter’s bday next week.  It has always been winter weather, usually snowing.  So bring on some shamrocks, rainbows and a whole huge pot of gold!  Spring is in the air!
St Paddy's Day green mason jar desserts with kiwi and lime jello and pound cake by dennasideas.com Extra bonus for you: 5 minute shamrocks:  use a heart punch.  punch. glue together, or not.  There you go.St Paddy's Day easy to DIY shamrocks  dennasideas.com Enough with the decorating, back to the desserts…St Paddy's Day green mason jar desserts with kiwi and lime jello and pound cake by dennasideas.com

My Mom gave me a flat of little mason jars, I’ve had so much fun with them!  They are the perfect size for individual desserts.  So instead of making a big trifle with the pound cake I baked the other day, I made these jar desserts for each of us.  It wasn’t very difficult to fill the jars.  All you need is cake, whipped cream, jello and some fruit slices.  The other day I baked up a vanilla pound cake, the old fashioned kind, and tinted it green.  (any kind of cake should work).  I sliced the pound cake up then cut out circles with a cookie cutter.  Mix up some green gelatin/jelly jello, I used lime flavor.  Use a tiny bit less water than called for, and do the ice cube method to cool it off faster.  Add a few spoonfuls of jello to each jar, then let it set up (I stuck them into the freezer for a bit) while you are cutting the cake into circles and whipping the cream (or Cool Whip will work).  The rest of the jello went into the fridge to start setting up.

St Paddy's Day green mason jar desserts with kiwi and lime jello and pound cake by dennasideas.com So, jello, a round of cake, a squeeze of whip cream.  Then slice up some kiwis and chop each slice in half.  Set them in the jars against the side (so you can see them!), then fill up the hollow with some jello when it is half-set, so it is still kind of blobby and pourable.  Then another layer of cake and some whipped cream.  Let them sit for as long as possible in the fridge (overnight is best. Especially if the cake was a little stale!)  When I open them up, I’ll add another slice of kiwi on top.  I love that these jars have lids, so easy to pop into the refrigerator.  They would be great to take on a picnic (if the weather was nice enough!), or even for the kids’ lunches (if I was nice enough!)St Paddy's Day green mason jar desserts with kiwi and lime jello and pound cake by dennasideas.com My favorite Irish band has a new release today! yay! And here’s a great watch for today:

Easy Pink Dough Valentines for Preschoolers

Standard

An easy way for toddlers and preschoolers to celebrate Valentine’s Day!  Pink dough to play with!  Mix up a quick batch of pink colored dough and break out the heart cookie cutters!  The recipe I used is at the end of the post.  Here’s my nostalgic look back at my babies busy at work on their “Valentines”Pink Dough for Preschool Valentines by dennasideas.com - Page 008We’re going to make something!Pink Dough for Preschool Valentines by dennasideas.com - Page 007Pink Dough for Preschool Valentines by dennasideas.com - Page 005Squish that pinkness!Pink Dough for Preschool Valentines by dennasideas.com - Page 004The idea was to get them to make a Valentine on the table, then I would photograph it as their “valentines” for Daddy and Grandma and Grandpa.Pink Dough for Preschool Valentines by dennasideas.com - Page 006And that’s what we did.Pink Dough for Preschool Valentines by dennasideas.com - Page 002Pink Dough for Preschool Valentines by dennasideas.com - Page 001It was a lot of very pink fun!  I had to play a bit, too….Pink Dough for Preschool Valentines by dennasideas.com - Page 003Here’s the recipe I use for play dough:

2 and 1/2 cups of white all purpose flour   (I’ve tried it with whole wheat flour, and let’s just say…No!)

1 cup of salt  (fine, not coarse)

2 small packages of Kool Aid  (the ones without real sugar)  this is optional. if you don’t have Kool Aid, then add food coloring

3 tsp. vegetable oil  (canola oil is good)

2 cups of boiling water

Mix all the dry ingredients together, then add the boiling water.  Stir it all together very well and turn out onto a surface where you can knead it a bit.  It will be hot, so let it cool a bit before kneading.  Then knead away until it becomes smooth.  When it’s cool enough, the kids can start playing.  As soon as it’s cool enough, either play with it or seal it in plastic bags so it doesn’t start drying out.  This will last for quite awhile in a sealed bag.   Note:  the Kool Aid is just for easy color and aroma!  We used cherry for Valentine’s day.  If the kids love the smell so much that they taste it, it won’t hurt them at all, just a little salty.  If there’s worry about the flour, then I’d say don’t add the Kool Aid and then it won’t smell appetizing enough for little ones to put into their mouths!

Fun for the kids to make, and the photos are easy to send to everyone online, no mess, no snail mail! 😉  Just digital cuteness from the kids!  Happy ❤ weekend!